The new AMX touch panels are setup for continued simple operation of the auditorium resources. All of the positions are the relatively the same but some of the names have been changed to make it more readable.
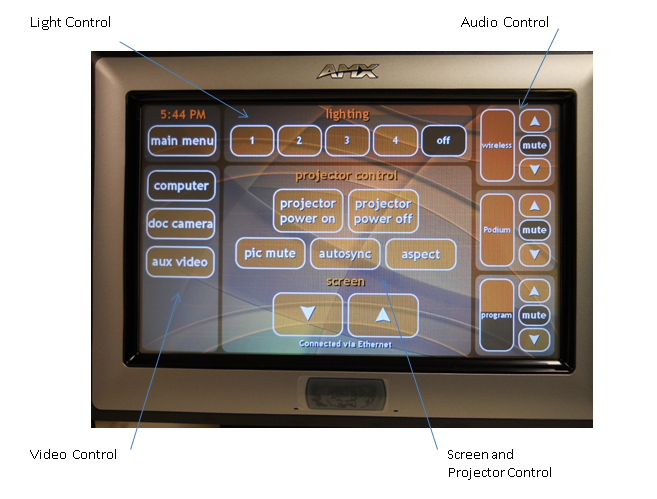
The Main Menu:
Light Control:
Button 1 turns off the front lights only.
Button 2 additionally turns off 1/2 of the floor lights
Button 3 additionally turns off everything but 4 fluorescent lights and lowers the floods
Button 4 additionally turns off the floods
Audio Control
Wireless controls the wireless microphone. The mute will be blinking when sound is muted. An activated line is adjustable up or down with the arrows
Podium controls the podium microphone XLR jack. The podium mic acts the same as the wireless. We will check this mike out to you for special occasions.
Program controls the audio information from the computers. If you attach your laptop via the 3.5mm audio cable available on the podium, you can control the volume from here.
Video Control
This column is an input selection section. Depending on which item you select the middle of the touch panel will offer different selections tailored to your left column selection.
Main Menu (above) will be where you turn the projector on and lower the screen.
Pic Mute will blank or black out the screen if pushed. Push again to turn it back on.
Autosync will cause the scaler to automatically try to detect your computer (like old scaler remote)
Aspect will set the aspect ratio for the projector; either 4:3 (standard and default) or 16:9 (widescreen)
IF UNIT IS MALFUNCTIONING ALWAYS CHECK UNDER THE SCREEN BUTTONS AND MAKE SURE IT SAYS "CONNECTED VIA ETHERNET"
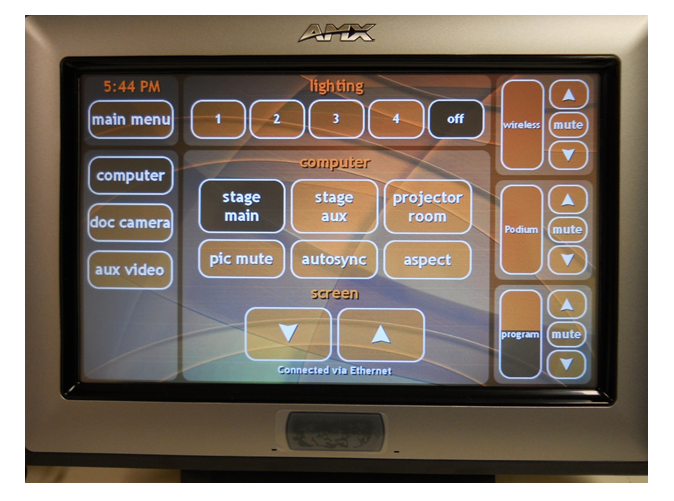
Computer:
The computer menu will have all of the same outside buttons but will have a couple of changes in the middle.
Stage Main is what should be selected to use the podium setup that is common in B102. If it's not selected then you should select it to insure computer inputs to the switching system etc.
Stage aux is selected if you would like to use the podium on the other side of the front speaking area. We rarely move the podium but it's available if needed.
Projector Room is for use by staff in emergencies and although all the plugins are there, some have been re-routed. Call (244-347) before using this one.
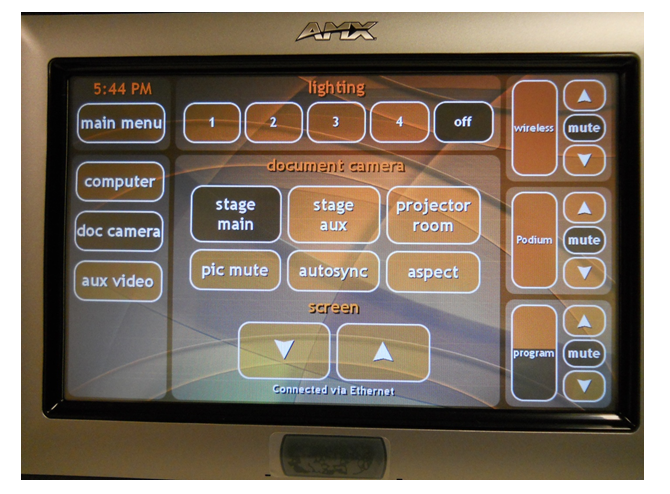
Doc camera:
Same middle screens as the computer selection. The Document camera is in the drawer on the right side of the large podium. Currently we are using an Elmo with extending camera boom and side lights. The small monitor on the tray can be used to see alignment.
Aux video:

Same as computer except the autosync is not needed for this screen. This window will mostly be used in special setups. Please call 244-3479 if auxiliary video setup is needed.
IF UNIT IS MALFUNCTIONING ALWAYS CHECK UNDER THE SCREEN BUTTONS AND MAKE SURE IT SAYS "CONNECTED VIA ETHERNET"
General Usage:
The system will function as before concerning feel and connectivity.
The computers used on the podium are capable of running Powerpoint, Word, Excel and will also play DVDs (standard resolution). A Powerpoint presentation with large embedded videos should be played with our Dell machine as it has a high speed video card in it. USB plugins are labeled and are available just in front of our Samsung monitor on the large podium.
A laptop can be attached on the podium top with the VGA cable and 3.5mm audio cable. Adapters have been gathering by our monitor for use with the various Mac laptops available. If your screen doesn"t align on the projector screen touch the autosync button on the touch panel to tell the scaler to force it up there.
Whether you select your own laptop or either of our computers, please touch the small switcher button corresponding to your choice of input. This switcher is located at the lower right of the large podium and is labeled with computer types to be selected. USB and audio follow through this device as well.
Typical Laptop Setup:
-
Attach the computer
to the VGA cable (small podium) either straight or with adapters provided on the large podium. If you have audio content attach the 3.5mm audio plug to your laptop headphone jack.
-
Change the switcher
(large podium bottom right) to Laptop (pos. 3).
-
Set the AMX touch panel to main stage, computer, and needed sound selections.
-
Go to the main menu and
turn on the projector and lower the screen.
-
This is the best time to turn on the laptop
so it can see that the projector is out there and can auto set resolution. If the laptop is on already when the computer is placed on the podium then make sure that the video output port is on and if it can't be seen make sure to switch it off and on once give the system and the computer another shot at communicating. On some occasions a Mac may need to have the video cable removed and re-attached a couple of times before it is willing to talk with the system.
-
At this point an image should appear on the projector screen as well as the monitor.
On some occasions the laptop will be setup so the second screen is an extension of the first. This will work as the presentation should show up on that screen but most users prefer the second screen to look like the laptop screen. This selection will either be "Mirror" or "Clone" in your system preferences, display settings. After changing this setting the screens should immediately look the same.
The upgrades to the system this spring/summer (2011) include:
New professional grade Shure lapel microphone
New Extron switching
New Extron equalization and of course the new touch panels.